In this post, we’ll learn how to create and set up a simple microservice application using Spring Boot. If you’re new to microservices or would like a refresher, feel free to check out my previous blog: Introduction to Microservices.
Microservices architecture can enhance the performance of your application by making it fault-tolerant, loosely coupled, and highly scalable. In this tutorial, we’ll walk through the steps to create a simple microservice application using Spring Boot.
For this example, we’ll be using Spring Boot with Maven as our dependency manager.
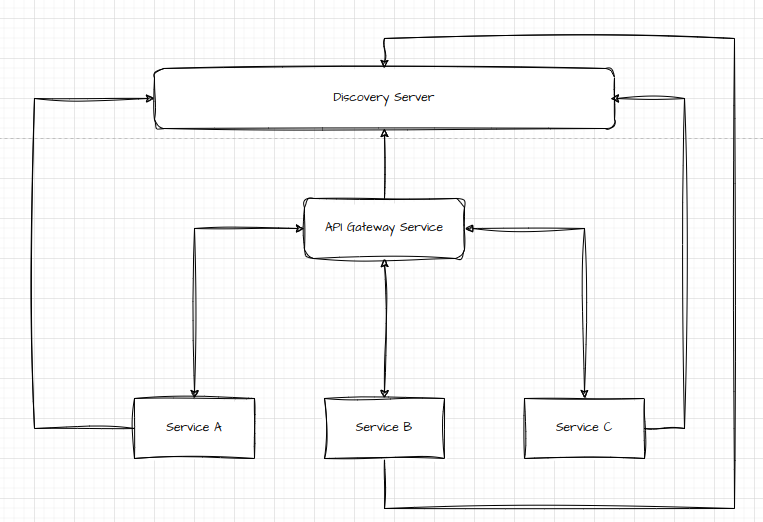
First let us see a simple diagram which will make the readers more easier to know how we will structure our application which we will design.

As shown in a simple diagram above to create an application following a microservice architecture we need to create few services which will to do certain work to group our application together. Let’s go through each components/services one by one as to what they are and how they will contribute in creating our architecture and help us design our spring application to adapt with Microservice architecture.
- Discovery Server : A Discovery Server is the centralized component where all services register themselves. It acts as a directory for service discovery and maintains the registry of all available services.
- API Gateway Service : A single entry point for all client requests that routes those requests to appropriate microservices, often integrating with the Discovery Server for dynamic routing.
- Service A,B & C : The services will be our independent spring boot application which will have their own code and logics to perform certain tasks and contribute in our microservice architecture architecture.
Now, as we have seen a simple architecture for our application let us start by creating and defining our discovery server.
Step 1: Discovery Server Setup and initiation
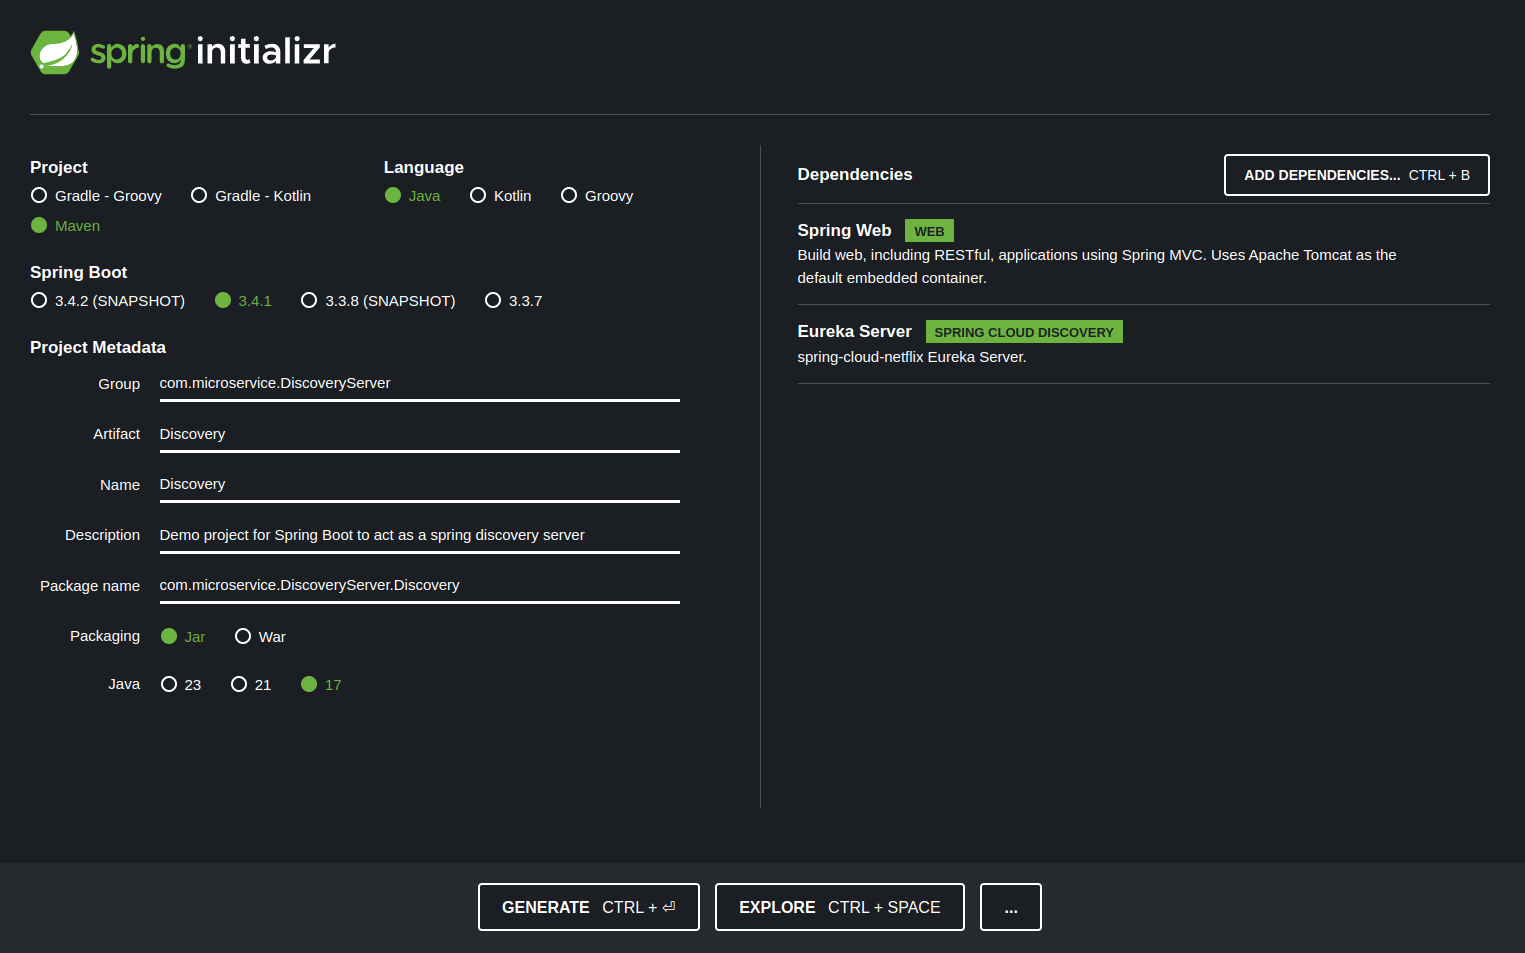
To create a discovery server in our microservice application we will be using a dependency in our springboot application known as Eureka Server in Spring Cloud let us initialize our first spring boot application using the spring initializer.
You can create a spring boot application by going to the spring initializer url -> Spring Initilizer
While generating a project you need to add the dependency as shown in the screensort attached below.

Once you generate the project and download it to make the spring application discover the services which we need to register we need to enable the discoveryServer in our spring boot application.
Firstly let us configure our configuration file.
If you are using application.properties file to write your configuration add the configuration shown below.
server.port=8761
eureka.client.register-with-eureka=false
eureka.client.fetch-registry=false
If you are using application.yml file to write your configuration then add the configuration shown below.
server:
port: 8761
eureka:
client:
register-with-eureka: false
fetch-registry: false
Let us know what the configuration is doing in the above code.
- to use the eureka server we define the port 8761 which is the default port for eureka server for the package and it will give us an admin page for our discovery server to check the running instances.
- eureka.client.register-with-eureka=false and eureka.client.fetch-registry=false tells our application that this is not an eureka client service and to not include it in the service registry.
Once done with the configuration let us tell our spring boot application that it needs to act as a eureka server to do that let us add the annotation @EnableEurekaServer in our spring application main class which will be the entry point of our spring boot application.
package com.microservice.DiscoveryServer.Discovery;
import org.springframework.boot.SpringApplication;
import org.springframework.boot.autoconfigure.SpringBootApplication;
import org.springframework.cloud.netflix.eureka.server.EnableEurekaServer;
@SpringBootApplication
@EnableEurekaServer
public class DiscoveryApplication {
public static void main(String[] args) {
SpringApplication.run(DiscoveryApplication.class, args);
}
}
Just by following these simple steps our discovery server is ready to discover the services ( i.e. individual spring boot applications ).
With the code added let us run our eureka server by simply starting our Spring boot application.
Step 2 : API Registry Service Creation and Setup
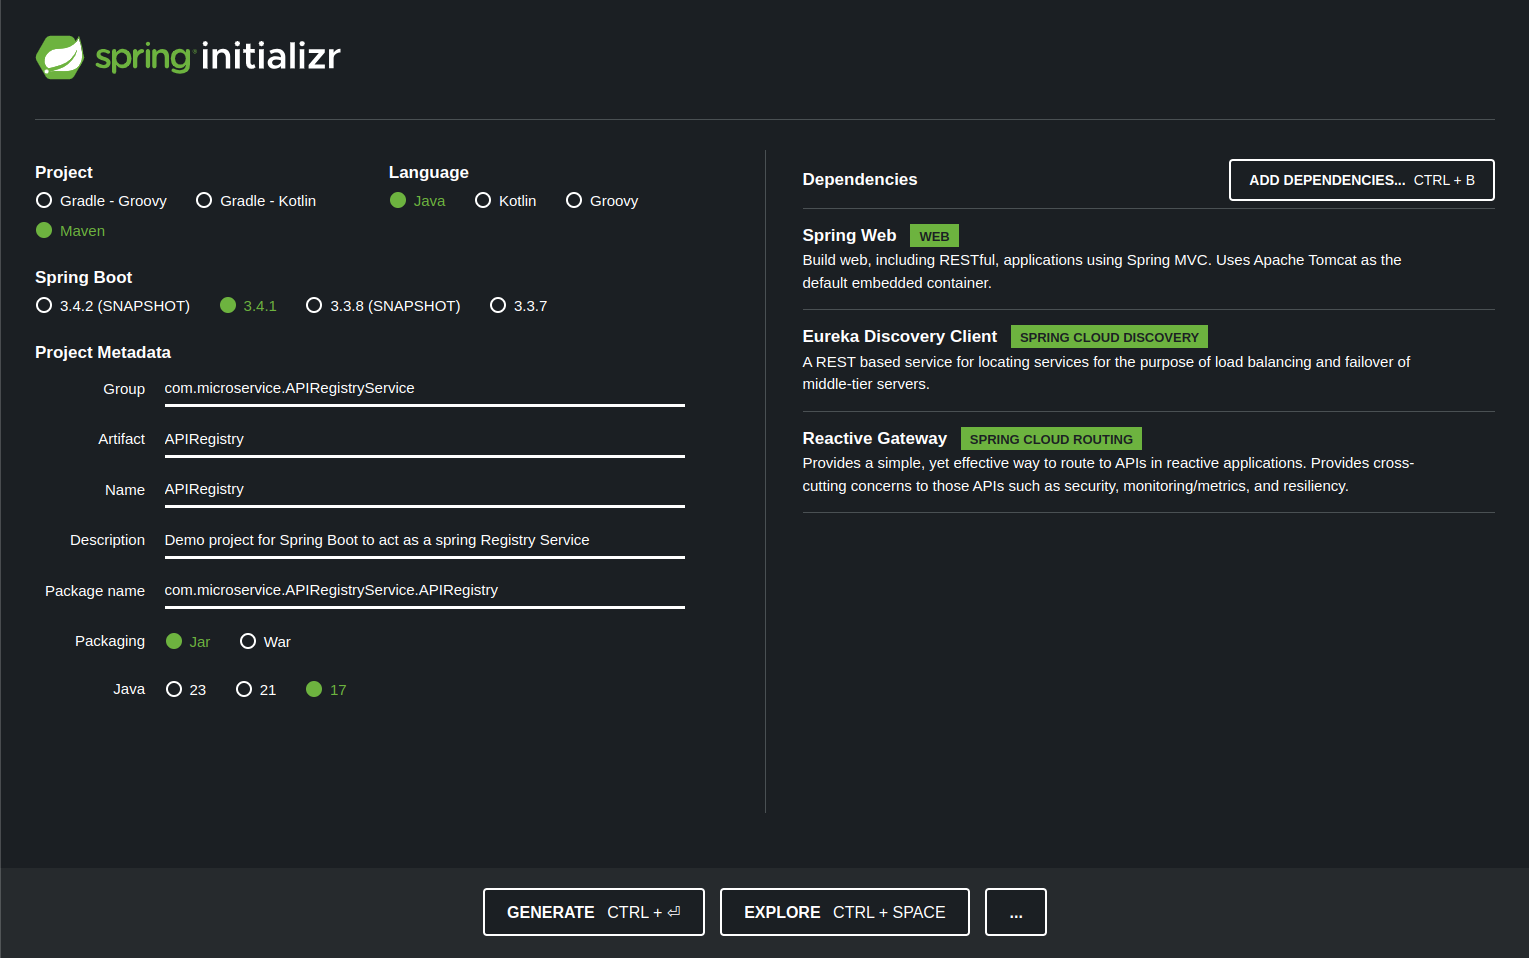
To make an API registry let us start by creating another spring boot application like we did for our discovery server as above but with few different dependencies as shown in the screenshot below.

With the project created and the dependencies added in our application first let us define a unique server port for our API gateway by changing application.properties file for the example i will define it as 8020.
server.port=8020
spring.main.web-application-type=reactive
server:
Port:8020
spring:
main:
web-application-type:reactive
Now to make the API Gateway service discoverable from our discovery server we created we need to add the @EnableDiscoveryClient annotation in our spring boot application entry point like shown below.
package com.microservice.APIRegistryService.APIRegistry;
import org.springframework.boot.SpringApplication;
import org.springframework.boot.autoconfigure.SpringBootApplication;
import org.springframework.cloud.client.discovery.EnableDiscoveryClient;
@SpringBootApplication
@EnableDiscoveryClient
public class ApiRegistryApplication {
public static void main(String[] args) {
SpringApplication.run(ApiRegistryApplication.class, args);
}
}
Just by adding the @EnableDiscoveryClient annotation we are telling our spring boot application that it is a service and the Discovery server should treat it as a service.
With done with the initial setup let us add our first configuration code utilizing the Reactive Gateway dependency to add the routings configuration in our code where we will be defining the dynamic routes for all the services which should be discovered by our microservice application.
Create a java class inside src/main/java/<your package name >/configurations/<configurationFileName.java>
I will create a class called RoutesConfiguration.java file inside the configurations package and mark the class as a configuration class using @Configuration annotation. Once done with the step I will inject a bean class called RouteLocator to setup our dynamic routes for the microservices that we will be creating moving forward. The configuration class looks something like this as shown below.
@Configuration
public class RoutesConfiguration {
@Bean
public RouteLocator routes(RouteLocatorBuilder builder) {
return builder.routes()
.build();
}
}
Here, RouteLocator will be resolving the routes in our application where we use the RouteLocatorBuilder to build our route for each service which we will create.
With the code above we were able to create a DiscoveryServer and Added our first independent service called APIGateWay service to resolve dynamic or static routings as per the need.
Step 3 : Create Todo Service
After creating the discovery server and API gateway, let’s design a Todo service. This service will be a simple Spring Boot application for storing and managing users’ todo lists. Follow these steps to get started:
<dependency>
<groupId>org.springframework.boot</groupId>
<artifactId>spring-boot-starter-data-jpa</artifactId>
</dependency>
<dependency>
<groupId>org.springframework.boot</groupId>
<artifactId>spring-boot-starter-security</artifactId>
</dependency>
<dependency>
<groupId>org.springframework.boot</groupId>
<artifactId>spring-boot-starter-web</artifactId>
</dependency>
<dependency>
<groupId>org.springframework.cloud</groupId>
<artifactId>spring-cloud-starter-netflix-eureka-client</artifactId>
</dependency>
<dependency>
<groupId>org.springframework.boot</groupId>
<artifactId>spring-boot-devtools</artifactId>
<scope>runtime</scope>
<optional>true</optional>
</dependency>
<dependency>
<groupId>com.mysql</groupId>
<artifactId>mysql-connector-j</artifactId>
<scope>runtime</scope>
</dependency>
<dependency>
<groupId>org.projectlombok</groupId>
<artifactId>lombok</artifactId>
<optional>true</optional>
</dependency>
<dependency>
<groupId>org.springframework.boot</groupId>
<artifactId>spring-boot-starter-test</artifactId>
<scope>test</scope>
</dependency>
<dependency>
<groupId>org.springframework.security</groupId>
<artifactId>spring-security-test</artifactId>
<scope>test</scope>
</dependency>
Once the dependencies are added let us enable eurekaDiscoveryClient in our spring boot application and add the configuration for database connectivity and making the todo service discoverable by the discovery server in our microservice architecture service. The files will look like this as shown below after the edit.
server.port=8090
spring.datasource.url=jdbc:mysql://localhost:3306/todo_app_ms
spring.datasource.username=root
spring.datasource.password=root
spring.datasource.driver-class-name=com.mysql.cj.jdbc.Driver
spring.jpa.hibernate.ddl-auto=update
spring.jpa.show-sql=true
spring.jpa.properties.hibernate.dialect=org.hibernate.dialect.MySQL8Dialect
TodoServiceApplication.java
@SpringBootApplication
@EnableDiscoveryClient
public class TodoServiceApplication {
public static void main(String[] args) {
SpringApplication.run(TodoServiceApplication.class, args);
}
}
Now let us add the dynamic routing in our ApiRegistry service to check the instance name of the discovered client i.e. TodoServiceApplication check the running instances in your discoveryServer i.e. http://localhost:8761 and modify the RoutesConfiguration.java class as shown below with your instance name for dynamic routing and the paths you want to be discovered.
@Configuration
public class RoutesConfiguration {
@Bean
public RouteLocator routes(RouteLocatorBuilder builder) {
return builder.routes()
.route(route -> route.path("/**").uri("lb://TODOSERVICE")) // “lb://<your Service name listed as instances>”
.build();
}
}
With the steps completed let’s write our todo app code as shown below. We will be creating a simple rest api for creating a todo list for a user. The code looks something like this after creating rest endpoints and necessary authentication for user login and registration using spring security.
@Entity
@Data
@Table(name = "users")
public class User {
@Id
@GeneratedValue(strategy = GenerationType.IDENTITY)
private Integer id;
@Column(unique = true, nullable = false)
private String username;
@Column(nullable = false)
private String password;
@OneToMany(mappedBy = "user", cascade = CascadeType.ALL, orphanRemoval = true)
@JsonManagedReference
private List<Todo> todos = new ArrayList<>();
}
@Entity
@Data
public class Todo {
@Id
@GeneratedValue(strategy = GenerationType.IDENTITY)
private Long id;
private String title;
private String note;
@ManyToOne
@JoinColumn(name = "user_id")
@JsonBackReference
private User user;
}
@Repository
public interface UserRepository extends JpaRepository<User,Long> {
User findByUsername(String username);
}
@Repository
public interface TodoRepository extends JpaRepository<Todo, Long> { }
@Configuration
@EnableWebSecurity
public class SecurityConfig {
@Autowired
private DetailsService detailsService;
@Bean
public SecurityFilterChain securityFilterChain(HttpSecurity httpSecurity) throws Exception {
return httpSecurity
.csrf(customizer -> customizer.disable())
.authorizeHttpRequests(customizer -> customizer
.requestMatchers("/login","/register")
.permitAll()
.anyRequest().authenticated())
.httpBasic(Customizer.withDefaults())
.build();
}
@Bean
public AuthenticationProvider authenticationProvider() {
DaoAuthenticationProvider provider = new DaoAuthenticationProvider();
provider.setPasswordEncoder(new BCryptPasswordEncoder(12));
provider.setUserDetailsService(detailsService);
return provider;
}
@Bean
public AuthenticationManager authenticationManager(AuthenticationConfiguration configuration) throws Exception {
return configuration.getAuthenticationManager();
}
}
public class CustomUserDetails implements UserDetails {
private final User user;
public CustomUserDetails(User user) {
this.user = user;
}
@Override
public Collection<? extends GrantedAuthority> getAuthorities() {
return null;
}
@Override
public String getPassword() {
return user.getPassword();
}
@Override
public String getUsername() {
return user.getUsername();
}
@Override
public boolean isAccountNonExpired() {
return true;
}
@Override
public boolean isAccountNonLocked() {
return true;
}
@Override
public boolean isCredentialsNonExpired() {
return true;
}
@Override
public boolean isEnabled() {
return true;
}
}
@Service
@Slf4j
public class UserService {
@Autowired
private UserRepository userRepository;
@Autowired
private TodoRepository todoRepository;
public User register(User user){
return userRepository.save(user);
}
public String verifyUser(User user) {
User existingUser = userRepository.findByUsername(user.getUsername());
log.info("Got User {}", existingUser);
if (existingUser != null && existingUser.getPassword().equals(user.getPassword())) {
return "Authentication Successful";
}
return "Authentication Failed";
}
public List<Todo> getTodoList(Authentication authentication) {
return getUserInfo(authentication.getName()).getTodos();
}
public Todo createTodo(Authentication authentication, Todo todo) {
User user = getUserInfo(authentication.getName());
todo.setUser(user);
user.getTodos().add(todo);
return todoRepository.save(todo);
}
public Todo editTodo(Authentication authentication, Long todoId, Todo updatedTodo) {
User currentUser = getUserInfo(authentication.getName());
Todo toUpdateTodo = todoRepository.findById(todoId).orElseThrow(
() -> new RuntimeException("Todo not Found")
);
// verify if the logged in user is authenticated to update the todo information
if(!toUpdateTodo.getUser().getId().equals(currentUser.getId())) {
throw new RuntimeException("You are not authorized to update this Info!!");
}
toUpdateTodo.setNote(updatedTodo.getNote());
toUpdateTodo.setTitle(updatedTodo.getTitle());
return todoRepository.save(toUpdateTodo);
}
public String deleteTodo(Authentication authentication, Long todoId) {
User currentUser = getUserInfo(authentication.getName());
Todo currentTodoRecord = todoRepository.findById(todoId).orElseThrow(
() -> new RuntimeException("Invalid Id!")
);
if(!currentTodoRecord.getUser().getId().equals(currentUser.getId())) {
throw new RuntimeException("You are not authorized to remove the Record!!");
}
todoRepository.delete(currentTodoRecord);
boolean isRemoved = todoRepository.findById(todoId).isEmpty();
if (isRemoved) {
return "Record Deleted Successfully";
}
return "The record was not removed!!";
}
private User getUserInfo(String username){
return userRepository.findByUsername(username);
}
}
@Service
public class DetailsService implements UserDetailsService {
@Autowired
private UserRepository userRepository;
@Override
public UserDetails loadUserByUsername(String username) throws UsernameNotFoundException {
User user = userRepository.findByUsername(username);
if(user == null) {
System.out.println("User not found");
throw new UsernameNotFoundException("User not found");
}
return new CustomUserDetails(user);
}
}
@RestController
public class UserApiController {
@Autowired
private UserService userService;
@PostMapping("/register")
public User registerUser(@RequestBody User user) {
return userService.register(user);
}
@PostMapping("/login")
public String login(@RequestBody User user) {
return userService.verifyUser(user);
}
@GetMapping("/show-todo-list")
public List<Todo> showTodo(Authentication authentication) {
return userService.getTodoList(authentication);
}
@PostMapping("/add-todo")
public Todo addTodo(Authentication authentication,@RequestBody Todo todo) {
return userService.createTodo(authentication,todo);
}
@PutMapping("todo/edit/{todoId}")
public ResponseEntity<Todo> editTodo(Authentication authentication,
@PathVariable Long todoId,
@RequestBody Todo updatedTodo) {
Todo editedTodo = userService.editTodo(authentication, todoId, updatedTodo);
return ResponseEntity.ok(editedTodo);
}
@DeleteMapping("todo/delete/{todoId}")
public String deleteTodoRecord(Authentication authentication,@PathVariable Long todoId) {
return userService.deleteTodo(authentication,todoId);
}
}
In the similar way like we saw above you can create other services as well which will perform certain tasks and contribute in your application.
You can find the full above example code on the following Github link.